How to Build A Tent From Scratch: 5 Steps [Full DIY Guide]
I know the importance of having a good and safe shelter. I am sharing my experience building a tent from scratch today. With just a few basic materials and some know-how, you, too, can create a cozy home away from home in the great outdoors.
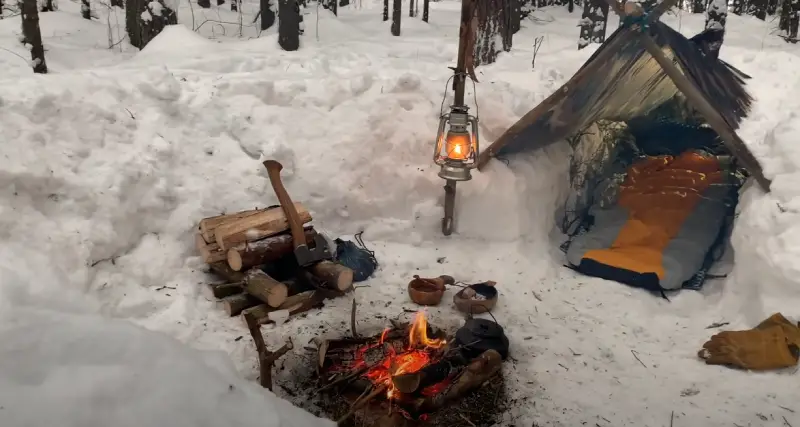
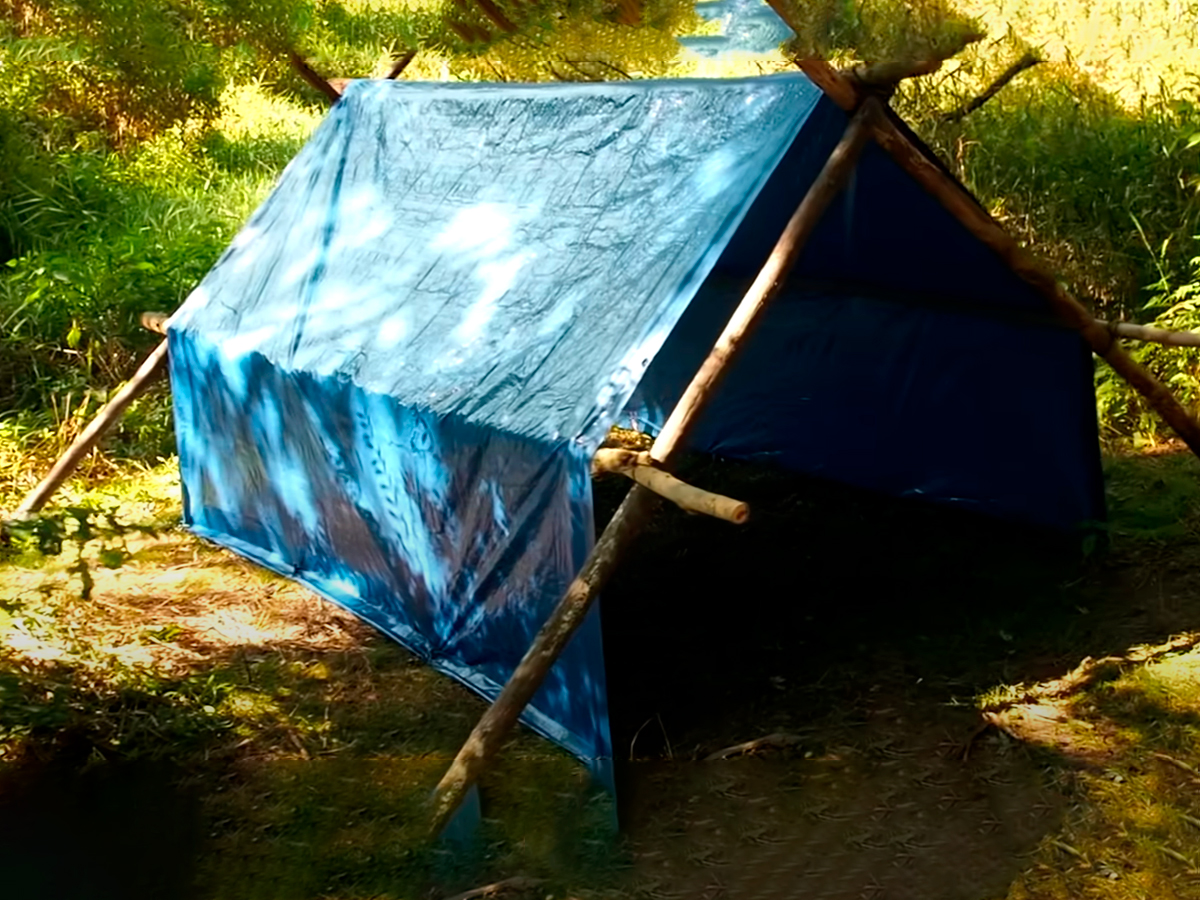
I found a simple way of building a tent from scratch. First, I see two trees about 10 feet apart and tie a rope for the ridgeline. Then, I lay a tarp on the ground as my floor and placed another tarp over the ridgeline to form a triangular roof. It’s perfect for me, my baby, and our furry companion.
I’ll share my experience and give you all the essential tips for building a tent from scratch, even in the wildest places.
How To Build A Tent From Scratch: 5 Steps
I want to share our cozy tent-building journey with you. Join me as I provide tips on creating a safe and comfortable shelter.
Checking the Site
I know all too well the importance of finding a good location for setting up a tent. When you have a baby and pet with you, safety and comfort are top priorities. That’s why I always take the time to thoroughly check the site before building our tent.
I make sure the ground is suitable for setting up a tent. Soft, level land is ideal, but if that’s impossible, there are ways to work around it. For example, if the ground is too hard, I may need to use extra stakes or bring a mallet to drive them into the ground.
Another essential factor to consider is dampness. While it may seem counterintuitive, a slightly damp ground can provide a sturdier foundation for your tent. The dry land can be too complex and rocky, making it difficult to drive in stakes and secure your tent safely. If the ground is too wet or muddy, it can make for an uncomfortable and messy experience.
I look for thick grass or vegetation areas to find the perfect damp ground. These areas tend to hold more moisture in the soil. I also pay attention to the general topography of the site. Low-lying areas or spots near bodies of water may be damper than higher elevations.
Tying the Frame
One crucial aspect I learned is the importance of securely tying the frame to the trees. Here are some tips that helped me tie the frame effectively.
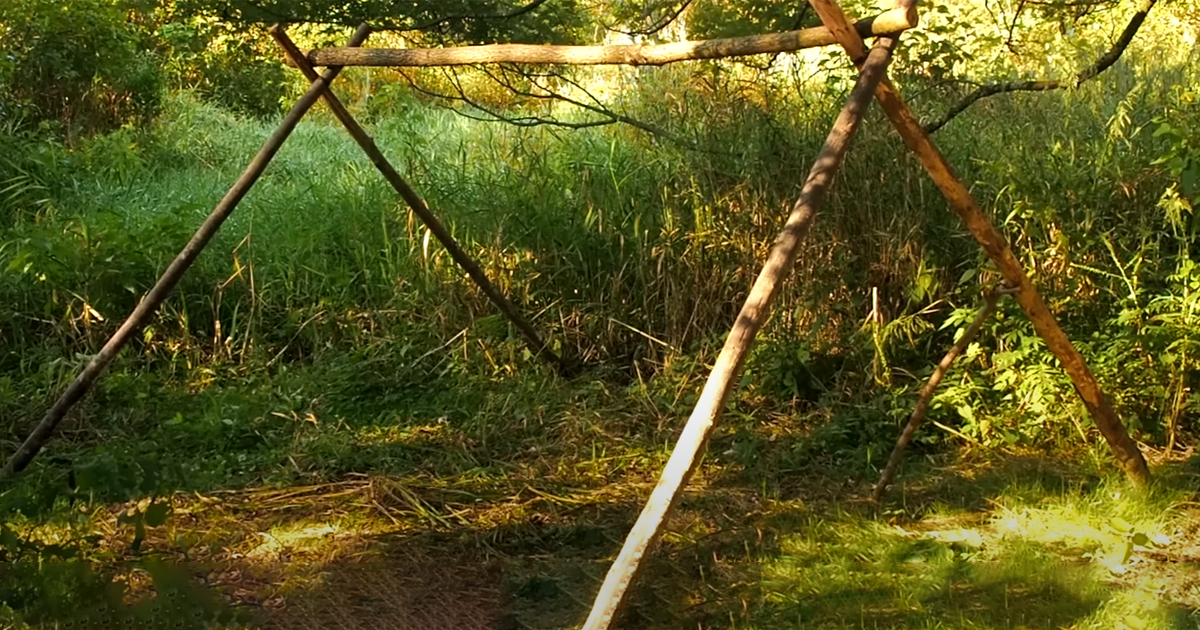
I gathered heavy-duty rope and long branches to secure the tent frame. It was essential to choose solid and sturdy branches that could handle the weight of our tent.
I scouted for two suitable trees that were spaced apart enough to accommodate the size of our tent. I checked that the trees were stable and had no weak spots that could give way during the night. Trees with a diameter of at least six inches were ideal, and I ensured they were healthy and alive.
When tying the tent frame to the trees, I wrapped the rope around each tree at least three times. This technique ensured the rope wouldn’t slip down, keeping our tent secure. I confirmed the rope was neither loose nor tight, achieving the perfect balance.
I considered using tree-friendly straps or padding to protect the bark of the trees from any potential damage caused by the rope. This step was essential to me as it helped preserve the environment and kept the trees healthy.
These tips and precautions made our camping experience more enjoyable and gave me peace of mind knowing that our tent was securely tied to the trees, providing a safe and comfortable shelter for my baby, pet, and me.
Securing the Floor
I will guide you on securing the floor of your tent, explaining the process of connecting it properly. Rest assured, you’ll learn how to ensure secure and stable flooring for your tent.
First off, I needed large tarps and tent stakes. I measured the space where I would set up my tent and purchased appropriately-sized tarps. Before laying down the tarp, I always checked the ground for sharp objects or rocks . This step prevented any damage to the tarp and provided a smoother surface for the tent.
Once the tarp was flat, I staked the edges with tent stakes to hold it in place. I used additional stakes to prevent the tarp from flapping in the wind if the ground was soft. Overlapping the tarp’s edges was crucial to ensure no gaps for water to seep in.
Securing the tent floor was vital for a worry-free camping trip with my baby and pet. With these tips and suitable materials, I could set up a secure tent flooring and enjoy our camping adventure.
Constructing the Walls

Building tents from scratch can be quite a challenge. But with some tips and tricks, I’ve found a way to make constructing tent walls a breeze.
Let’s talk about the materials I needed. I gathered a second tarp, tent stakes, ropes, and sturdy branches. Choosing branches that could support the tarp and create a secure barrier for our tent was crucial.
Once I had all the materials, I set up the walls. I laid the second tarp on the ground, exactly where I wanted our tent to be. I placed the branches along the tarp’s edge and ensured they were sticking up and could hold it in place.
Next, I drove the tent stakes into the ground. I used rocks or other heavy objects to secure the stakes if the floor was too hard.I then tied the ropes to the stakes and attached them to the branches, ensuring they were tight to prevent the tarp from moving.
Now came the tricky part: Ensuring the walls were firmly fastened to the ground. I used extra stakes or rocks to reinforce the branches and ropes. It was essential to make the tarp taut to withstand wind and other weather conditions.
Lastly, constructing barriers to keep water out of the tent was crucial. I used additional tarps or branches to create a slope outside the tent. This helped the water run off and away from our cozy shelter.
So, I’ve learned how to tackle the challenge of building tents from scratch. With suitable materials, creativity, and clever techniques, I can create a safe and comfortable haven wherever our adventures take us.
Troubleshooting Common Problems
Let me tell you about our common problems and how I overcame them.
Finding a suitable location was a challenge. I needed a flat, dry spot away from potential hazards. After scouting, I finally found the perfect place that met our criteria. It took some time, but ensuring our safety and comfort was worth it.
Another problem I faced was realizing I needed to remember some essential equipment. A tent from scratch requires tent poles, stakes, a mallet, and guylines. Unfortunately, I forgot to pack our mallet. Thankfully, I was resourceful and managed to improvise with a nearby rock. But let me tell you. It would have been much easier if I had packed everything I needed from the start.
To solve these common problems, I learned the importance of thorough research and being prepared. Having a checklist of all the necessary equipment and scouting potential locations beforehand can save you a lot of trouble. And feel free to ask for help from fellow campers or park rangers if you encounter any difficulties.
Let me share some miscellaneous tips I picked up. Always remember to have a rainfly, choose a size that suits your needs, and practice setting up your tent before your trip. I know the importance of being prepared for anything. By following these tips and setting up your tent correctly, you can ensure a safe and comfortable night in the wilderness.
Conclusion
I strongly recommend building your tent instead of relying on expensive hotels or unreliable rented tents. Building a shelter from scratch gives a sense of satisfaction and independence and makes memories for your loved ones.
Always check the site, tie the frame, secure the floor, and construct the walls to prevent unexpected problems. So, gear up, follow the instructions, and enjoy your night under the stars.
FAQs
What Is The Best Way to Make Cheap Tents?
I securely fastened a string between two sturdy points. Then, I draped a sheet over it like an A-frame, creating a simple and swiftly assembled shelter. To add some comfort, I placed some pillows underneath. I discovered another option. I slid a dowel beneath the fabric and used strings to affix it to the ceiling. This provided us with an alternative setup.